

PGP, which stands for Pretty Good Privacy, is a type of public/private key encryption. It is strongly advised to utilise encryption in order to enhance the security of your messages and, if desired, to verify the sender’s identity.
I would advise against using PGP on a Windows operating system, as it is not advisable from an OPSEC perspective. This is because you may end up with something along these lines:
—BEGIN PGP PUBLIC KEY BLOCK—
Version: GnuPG v2.0.22 (MingW32)
PGP KEY…
—END PGP PUBLIC KEY BLOCK—
As you can observe, the version is displayed, which is not ideal for you. Should your PGP Public Key fall into the hands of the FBI, they could easily compromise your PGP using their advanced software, resulting in the compromise of your messages signed with PGP.
My recommendation is to always use PGP with a Linux OS, and if possible, to do so in Whonix.
Example:
—BEGIN PGP PUBLIC KEY BLOCK—
PGP KEY…
—END PGP PUBLIC KEY BLOCK—
As you can see, this is more secure and private, as the version does not appear.
Note: Regardless, it is essential to change your PGP Keys at least once a month to ensure the best operational practice.
1. Linux (GUI):
– Install the GNU Privacy Assistant, or GPA for short. This can be accomplished by entering the following command into the terminal:
Code: Select all
sudo apt install gpa
– Now, open GPA using the terminal, simply input:
Code: Select all
gpa
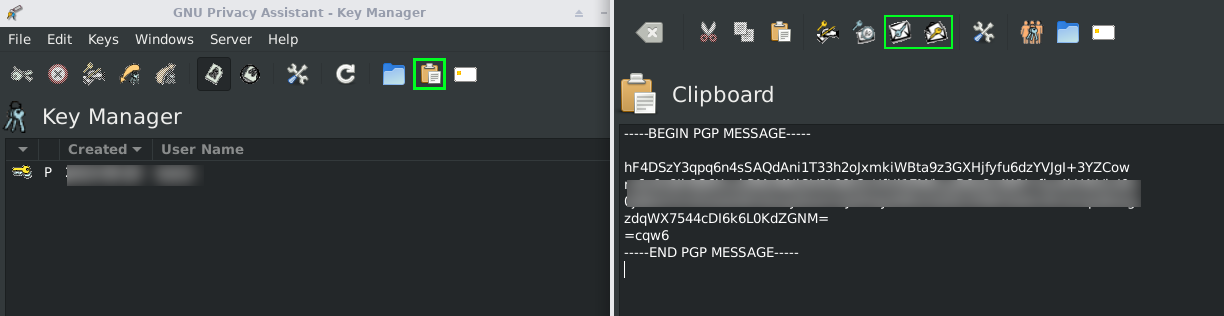
Upon launching the application, the Key Manager window shall appear. The buttons for importing and exporting keys should be readily apparent. To encrypt a message, click the Clipboard button, which will open a new window for text input. Enter your desired text into the provided box and click the button labelled “Encrypt the buffer text”. Subsequently, select the public key of your intended recipient. After clicking “OK” and entering your password, the encrypted message shall materialise.
To decrypt a message, simply paste the encrypted text into the designated box and click the button labelled “Decrypt the buffer text”. Upon entering your password, the message should be displayed in plain text. Should the decryption fail, this typically indicates that the message was either erroneously encrypted with the incorrect public key or was not intended for the recipient:
This should suffice to cover the fundamental aspects of using GPA. For further information, one may consult the manual page by entering:
Code: Select all
man gpa
2. Linux (CLI):
Open a Terminal window and execute the installation of gpg.
Code: Select all
sudo apt-get install gnupg2
Generate a key. It is advisable to utilise an expiring 4096-bit key.
Code: Select all
gpg --full-gen-key
Optionally, upload the public key to the keyserver.
Code: Select all
gpg --send-keys --keyserver pgp.mit.edu key_id
Note: The key ID may resemble this: 0xA19E94B21E3CB11C or this: A66B81FA97F9573AEA83ED9A19E94B21E3CB24A
To import another individual’s public key, ensure it is preserved as a file. Typically, it will be a .asc file, although the file extension is not of utmost importance.
Code: Select all
gpg --import name_of_pub_key_file.asc
Display the public key.
Code: Select all
gpg --armor --export key_id
Export the public key.
Code: Select all
gpg --armor --export key_id > pub_key.asc
Export the secret key.
Code: Select all
gpg --armor --export-secret-key key_id > secret_key.asc
Encrypt a message.
Code: Select all
gpg --encrypt --sign --armor -r key_id name_of_file
List keys.
Code: Select all
gpg --list-keys
Decrypt a message.
Code: Select all
gpg -d name_of_file.asc > decrypted_filename
Several security considerations:
In the event that you prefer to keep the file name confidential when the recipient decrypts your message (e.g., message.txt), modify the file name using the –set-filename option. To encrypt the message:
Code: Select all
gpg -esa -r key_id --set-filename new_filename.txt current_filename.txt
To output to a file:
Code: Select all
gpg -esa -r key_id --set-filename new_filename.txt current_filename.txt > new_filename.txt.asc
Sign a key
As part of the web of trust, you have the ability to cryptographically sign another individual’s public key. This action demonstrates secondary trust. For instance, Whonix’s key is signed by a Debian developer.
Code: Select all
gpg --edit-key key_id
Sign the key.
Code: Select all
sign

save
Verify signatures.
Code: Select all
gpg --check-sigs